|
|
Another amateurish-looking web page with more information than advertising, brought to you by Ooblick Tacky Home Décor.
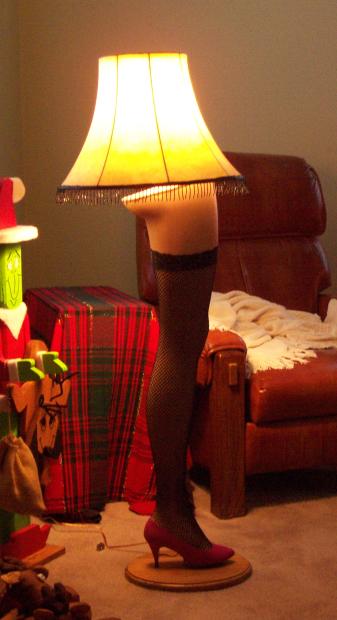
If you've seen the movie "A Christmas Story", you may remember that the father won a "major award" in a contest. If you haven't seen this movie, it's probably either because you've never heard of it, or because you thought it was some saccharine-sweet holiday offering eructated by the Hollywood machine in the direction of the Frank Capra-loving segment of the marketplace in order to boost already soaring end-of-year sales figures. That's not entirely true. It is a sweet family movie, but it's not sappy, and definitely worth watching.
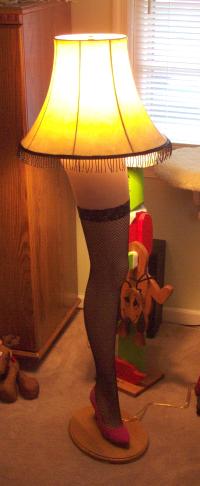
At any rate, the "major award" in question is a hideously tacky lamp, the base of which is a display mannequin leg wearing a fishnet stocking and a high-heeled pump.
When I saw "A Christmas Story" with my friend Jeanette, she pointed at the screen and said, "Ooh! I want one of those!" I told her, "You'll shoot your eye out!" (Note to people who haven't seen the movie: this is what's known as an in joke: a jest that isn't funny unless you've seen the movie.) She said, "No, not the Red Ryder BB gun with a compass in the stock. The lamp!"
Armed with this knowledge, I decided to make her this lamp as a Christmas present.
When you're shopping for the stocking and shoe, you can try to save money by buying only one of each.
If the shopkeeper is smart, she'll offer you a "buy one, get one free" deal, in which case you might as well take the free shoe or stocking, as the case may be. Maybe you can give it to a one-legged crossdresser.
If they still refuse to sell you a single shoe or stocking, see if you can get them listed separately on the receipt, so that you can return later and get a refund.
You will need a number of items to make your very own major award:
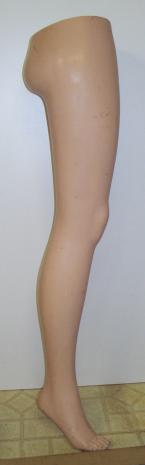
The hardest ingredient to find will undoubtedly be the mannequin leg. I got mine at the Mannequin Service Company on Light Street in Baltimore. The proprietor there was quite pleasant and seemed to go through about half of her stock looking for a suitable leg. If you don't live near Baltimore, you'll probably want to check the Yellow Pages or something. Be warned that walking into a warehouse crammed to the rafters with dummies and dummy parts is a somewhat surreal experience.
Note, too, that the leg used in the movie was not a mannequin leg, but a hosiery leg (go over to the pantyhose department in a store and you'll see the difference). If you can find one of these, so much the better: they're smaller than regular legs, and are made of plastic rather than fiberglass, so your lamp will shine from inside, the way the one in the movie does. Plus, it'll be the right height for a table lamp.
You'll want to shop for the shoe at a thrift store, since women's shoes aren't exactly cheap.
One approach to finding a shoe of the right size is simply to walk into the store with your mannequin leg and start putting shoes on it. If this isn't your style, you can measure the leg and make an educated guess. Be sure to measure how high the heel needs to be for your leg: stand the leg up straight, and measure the distance from the heel to the floor. When measuring shoes to see if they'll fit, measure from the bottom of the heel to the seam between the heel and the rest of the shoe.
As a point of reference, my leg turned out to be a size 6, with a 3 1/2-inch heel.
Your best bet for finding the base is a crafts store. While you're there, get six feet of fringe (or however much is required for your lampshade). Failing that, you can also try a hardware store; you'll need to go there for the lamp kit anyway.
Note that the base used in the movie is too small, in my opinion: it barely touches the tip of the shoe and doesn't go as far back as the heel. This is fine in the movies, but in the real world, you'll be dealing with cats, air currents, and gravity, so you want something larger and more stable. I used a 10x13" oval wooden base.
When you're getting the lamp kit, check the length of the cord: bear in mind that it'll be going all the way up the leg, which is a good deal taller than the lamps they seem to expect when they make these kits.
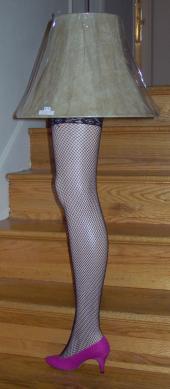
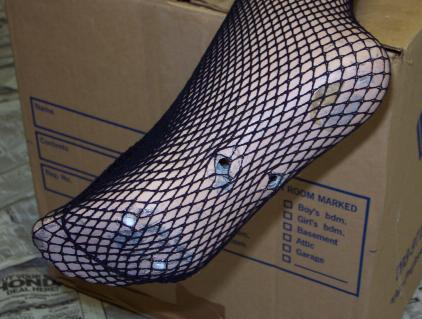
You can obtain the fishnet stocking at any lingerie store. You definitely need a fishnet stocking. A regular nylon one won't work, since you're going to make holes in it, and it'll run.
Tip: Get a lace-top stocking: the lace is good at hiding the glue you'll be using to attach the stocking to the leg.
I used a 2', 1/4"-diameter threaded rod as the main support. You can get this at a hardware store. In retrospect, two feet was probably overkill. You can probably get away with a foot.
|
The first thing to do is to wash the leg with soap and water. It's amazing how much warehouse dust there was on mine, to the point where the color was significantly different after the leg has been washed.
Before you start out, it's a good idea to put the stocking, shoe, and lampshade on the leg to get an idea of where you're going. You want the stocking to go almost, but not quite all the way up. You'll also want the leg to stand up straight when the high-heeled shoe is on.
Safety tip:
You're going to be sawing fiberglass, which will create fiberglass particles that'll get in your lungs and cause damage. Whenever you're working with fiberglass, be sure to use a filter.
Note that you'll find two types of filters at the hardware store: light-duty ones for things like pollen and dust when you're sweeping, and heavy-duty ones that give better protection against toxic substances. You want the heavy-duty one.
|
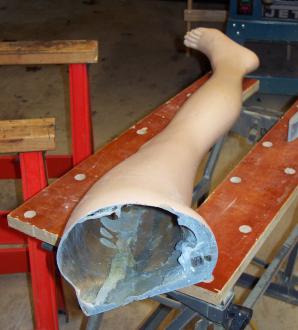
The first step is to saw the top off. For one thing, my leg had a rather ugly metal hinge at the top. For another, you want to be able to reach inside. If you're thinking of drilling a hole in the top and screwing the lamp hardware to that, forget it: unless you're Bob Vila and Martha Stewart rolled into one, there's no way you'll be able to thread an electrical cord into a hole in the foot, up four feet of fiberglass leg, and into a tiny hole at the top.
This part is fairly straightforward: just put on your filter, grab your hacksaw, and have at it. Don't forget to sand away any irregularities.
Tip: what with one thing and another, I wound up cutting the top off a slant. If possible, try to cut yours horizontally. That way, it'll be much easier to get the bulb to stand up straight. Plus, you won't have to worry about things like finding a slanted washer.
Tip: don't throw out the part that you sawed off: keep it as a spare piece of fiberglass that you can experiment on without messing up the real leg.
Place the board on top of the leg, where you just sawed it off, and draw the outline of the leg in pencil. Using a jigsaw, cut this shape out of the board, so that it'll fit neatly on top of the leg.
|
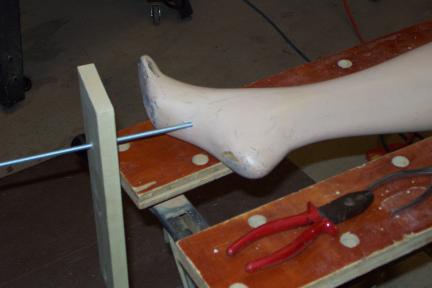
Now drill the hole for the threaded rod that'll provide the main support for the lamp (there'll also be two secondary screws to hold the toe, but that comes later). This was perhaps the single trickiest part of the whole operation.
The first problem is finding a spot to drill the hole. Since the foot will be wearing a high-heeled shoe, there'll be a gap between the base and the bottom of the shoe. Try to avoid having your support rod go through this hole, since it'll look ugly. I compromised by putting the hole as far forward as possible, so that the rod would be touching the inside of the shin. This left only a minimum of the rod exposed.
At the same time, drill the hole a little bit off to the left or right: women's shoes have a steel plate running through the sole, and you don't want to have to drill through that.
Another problem is that the hole needs to be vertical. Not only that, but you want the leg to be properly balanced, so that it won't fall over.
To solve this problem, I thought back to High School physics class, and remembered that if you hang an object, its center of mass will be directly underneath the point at which it's suspended.
I hung the leg between two boards, in such a way that it could swing freely from side to side, and hung a plumb line in front of the leg (actually, I just wedged the plumb line between the leg and the board). I let the whole thing settle down, then used the plumb line to draw a vertical line from the intended location of the hole. This gave me something to aim for while drilling. I did make a mistake in that I drew this vertical on the front, rather than on the back. That means that the toes got in the way of sighting.
You'll be screwing the rod into the foot, not just inserting it, so make your hole somewhat smaller than the rod. I used a 1/4" rod, so I made my hole 1/64" smaller, or 15/64" in diameter.
Tip: To screw the rod into the leg, the easiest thing to do is just to use the threaded rod as if it were a very long drill bit: insert one end into the drill, tighten, and let the drill do the hard work of threading fiberglass.
|
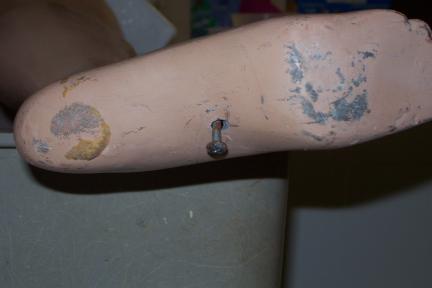
The next problem will be drilling a corresponding hole in the shoe. I tried measuring the foot and the shoe, but five or six attempts later, it became obvious that neither measurement nor trial and error were going to work.
A better solution turned out to be as follows: take a flat-headed screw that fits inside the support hole without falling in. Cover the head with soot, paint, or some other substance that'll leave a mark. Put the shoe on the foot. Take the shoe off, and see which part of the sole has a soot mark on it.
Even so, you'll want to drill a small hole for this, in case the mark wound up being in the wrong place. Also, the hole will be full of shredded gunk from the shoe sole, so you won't be able to see through it. Poke a piece of wire through it instead, to make sure the hole in the foot is opposite the hole in the shoe. Once you've made sure your small hole is at the right place, you can drill a 1/4" hole in the shoe.
Extreme Geekiness:
When I got to this point, I found I had about a dozen tasks and sub-tasks, and it wasn't clear in which order they needed to be performed.
So I wrote a Makefile with targets such as "drill-toe-holes" and "attach-stocking", with appropriate dependencies between them, and let make figure out in which order to do things.
Stain and finish the base. I suggest a darker color and a glossy finish, but that's just me.
Attach the rubber feet to the bottom of the base, following the directions on the package. Make sure not to have screws poking up through the top.
Put the shoe onto the foot, screw the support rod in until it just touches the floor. Now, put the leg with the shoe onto the wooden base, and draw an outline of the shoe, heel, and support rod. This will show you where to drill holes for the main support rod and for the secondary screws.
Drill a hole for the main support rod. Make it a full 1/4", since you're not going to be threading the base onto the support rod.
Now, clamp the whole leg-shoe-base assembly together, and drill holes for the secondary screws. These should go through the base and into the toe of the leg, since the toe part is solid, rather than hollow. These screws will provide additional support and can be adjusted to keep the lamp from falling over.
Since the secondary screws don't really have to be vertical or anything, just drill through the base, the shoe, and the foot. That way, all of the holes will be properly aligned.
Tip: Drill the hole about 1/64" smaller than the diameter of your screws so that you can properly thread the screws into the foot. Also, make sure your hole is deep enough (or that your screws are short enough). I originally used 2" machine screws, but didn't drill a 2" hole, and wound up snapping the two screws off inside the foot. That was a pain to fix.
You should also drill a hole for the lamp cord. This one need not go through the base, though, unless you really want it to.
|
If your leg has any stains, scuff marks, or discolorations, touch them up with paint.
Tip: The fishnet pattern of the stocking acts as camouflage, so all but the worst flaws will be nearly invisible. For the same reason, don't worry if your touch-up paint doesn't quite match the color of the leg.
Put the stocking on the leg, and hot-glue the top to the leg.
Tip: Draw, in pencil, a line on the leg to show where the top of the stocking should go. You'll be pulling the top back to apply glue, and this will help ensure that you don't glue it in the wrong place.
Tip: If you got a lace-top stocking, try to put the hot glue where the lace is. That way, the glue won't show as much.
Tip: Keep a cup of cold water handy. If (when!) you get hot glue on your fingers, dip them in water, and the glue'll come right off.
I also used hot glue to hold the threads of the stocking out of the way of the various holes I drilled in the foot. This probably isn't necessary, though, since a fishnet stocking probably won't run if you accidentally cut through it with a drill or screw..
While you've got the hot glue gun out and warmed up, glue the fringe to the lampshade.
If you managed to get a mannequin leg for displaying stockings, rather than a full-sized one, then your stocking is probably too long. The best thing to do is probably to glue the stocking to the leg, cut off the top, and glue on a separate garter (available at your friendly neighborhood lingerie shop) to hide the cut and give the ensemble an appropriately tacky look.

|
Okay, the end is in sight.
Put the shoe on the foot. In my case, the stocking bunched up, so I used a putty knife to push it into the shoe.
Thread the lamp cord through the shoe, into the leg, and out the top. This will require some persistence, since the cord will just want to bunch up at the bottom of the leg. You can use a fish tape to fish the cord out, or just use whatever works.
Attach the leg and shoe to the wooden base. Start with the main support rod, then the secondary screws. I used a somewhat complex arrangement involving nuts on the secondary screws, between the base and the sole of the shoe, to allow me to adjust the leg in case it tilted, but this proved unnecessary.
Drill a hole in the board that'll go on top, and attach the lamp harp and other bulb-related hardware to it (see the instructions that came with your lamp kit). If at all possible, try to put the hole above the main support rod: the lampshade is relatively heavy, and you want the lamp to be as balanced as possible.
Glue the board to the top of the leg. I used Liquid Nails, since it bonds to both wood and fiberglass. If there are any cracks between the board and the leg, you can fill them with wood filler.
Sand the board so that it really follows the contours of the leg. Make sure the top doesn't have any sharp edges. A Dremel tool is really handy for this.
At this point, I was rather pressed for time, what with the Christmas rush, so I had to leave the board as it was. If I had had time, though, I would have stained and finished it.
Put in a bulb. Attach the lampshade. Turn the lamp on. Bask in the warm glow of electric sex.
|